Showing posts with label recipe. Show all posts

Friday, August 24, 2012

White Chicken Enchiladas

This is hands down my favorite thing I've made since I started this Monthly Menu Planning thing. It's super simple (don't be fooled by the sauce) and tastes rich and creamy. I wasn't even really hungry by the time it was ready, but you can bet I gobbled up two of them! Studdly Hubby even gave this 4/5 stars! He's been really picky lately, so believe me, that's pretty good.


I used my frozen shredded chicken for this, and also froze the cheese and tortillas. I froze the sour cream, but it ended up separated and watery. I went out and bought some fresh. Won't try that again! The tortillas were fine though.


White Chicken Enchiladas (printable)

10 soft taco shells
2 cups cooked, shredded chicken
2 cups shredded Cheddar cheese
3 Tbsp. butter
3 Tbsp. flour
2 cups chicken broth
1 cup sour cream
1 (4 oz) can diced green chillies

1.  Preheat oven to 350 degrees.  Grease a 9x13 pan
2. Mix chicken and 1 cup cheese.  Roll up in tortillas and place in pan.
3. In a sauce pan, melt butter, stir in flour and cook 1 minute.  Add broth and whisk until smooth.  Heat over medium heat until thick and bubbly.  
4. Stir in sour cream and chilies.  Do not bring to boil, you don't want curdled sour cream.
5. Pour over enchiladas and top with remaining cheese.
6. Bake 22 min and then under high broil for 3 min to brown the cheese.


Not a very good photo, but this is how it comes out of the
oven...bubbly and delicious!


Monday, August 20, 2012

Chicken Pot Pie

Today's dinner was another quick and simple one, but big on comfort. Chicken Pot Pie!

This is how it looks straight out of the oven!

As always, the chicken came from a rotisserie chicken that I had shredded and frozen. When I assembled the meal for the freezer, I put individual baggies containing the chicken, frozen veggies, milk and egg combined and Bisquick mix in a large storage box and tossed the whole thing in the freezer. I pulled it out in time to thaw. It took me about 5-8 minutes to put the whole thing together. In fact, the oven wasn't even completely pre-heated when I was ready to put it in.

In the time it took for this to bake, I washed the few cooking utensils and mixing bowls I had used, and shredded a fresh chicken for future recipes.

It was the perfect comforting meal for the dreary, rainy evening we had!

Veggies, Chicken, Cream of Chicken Soup, Salt, Pepper
Topped with Bisquick Mix 

Dinner Time!


Chicken Pot Pie (click for printable)

What you need:

· 2 cups frozen veggies, thawed (any kind you like)
· 1 cup cooked chicken
· 1 can cream of chicken soup
· 1 cup biscuit baking mix
· 1/2 cup milk
· 1 egg

What you do:
1. Preheat oven to 400 degrees.
2. Mix veggies, chicken and soup. (Feel free to salt & pepper the mixture.)
3. Put veggie mixture in individual oven safe bowls or one large pie plate.
4. Mix the Bisquick, milk and egg in a measuring cup.
5. Pour batter on the veggie mixture.
6. Bake for 30 minutes.

Sunday, August 19, 2012

Buffalo Chicken Sandwiches

Have I mentioned that I love making quick and simple dinners? This is another one that falls into that category! Personally, I'm not a huge fan of spicy food, although I do like buffalo wings on occasion. Studdly Hubby does like it though, so I thought I'd try this out for him. Fortunately, the ranch dressing and cheddar cheese helped tone down the heat, so my mouth wasn't on fire!

I used shredded rotisserie chicken that I had previously frozen to save time and add flavor. I also used 4 whole wheat hamburger buns instead of 2 hogi rolls. Studdly Hubby's only complaint was that the bottom bun was a little too hard and crispy for his taste. I'm not sure how that can be avoided, so if anyone has any ideas, please let me know!

We went all out tonight and used the paper plates ;-)
Buffalo Chicken Sandwich (click for printable)
·   1/2 cup buffalo wing sauce
·   1/2 cup cheddar cheese
·   1/4 cup blue cheese or ranch dressing
·   2 hogi rolls


  1. In a small bowl, combine the chicken and buffalo wing sauce until the chicken is well coated with the sauce.
  2. Open the hogi rolls and spread the blue cheese dressing onto one side of the buns.
  3. Place 1 cup of the chicken into each roll, sprinkle with cheddar cheese, then transfer to a baking sheet.
  4. Bake in an oven preheated to 425 degrees for 10-12 minutes, or until the cheese is melted and the edges of the sandwich are golden brown.
  5. Serve immediately and enjoy!


Barbecue Chicken Quesedillas

This is a good one. And super simple! It's just chicken, cheese, onion and cilantro on tortillas with barbecue dipping sauce. But the really great thing about it is that you can change the ingredients to your taste. There are so many options! I also like doing a pizza version.


For the chicken, I use rotisserie chicken that I've shredded and frozen for just these kinds of occasions. It's easy and already has a great flavor. I used a Mexican mix for the cheese, which in retrospect, probably would have been better with cheddar for a barbecue version. I also chopped up a red onion and some cilantro. Studdly Hubby wasn't a big fan of the herb though. Again, this may have not been the best choice for barbecue. I didn't care for the barbecue sauce we had on hand so I dipped mine in salsa.

I don't have a fancy-dancy quesadilla maker, so I make them on our George Foreman grill. This has always worked just fine for me, and who needs another appliance cluttering up their kitchen counters? Because of the shape and size, I use one tortilla, place the filling on one half, then fold it over.


Once you close the lid, it only needs to grill for 3-5 minutes. Just enough to melt that cheese! 

This is a super easy, customizable dinner (or lunch) that is filling and delicious. Enjoy!


Beef and Broccoli

I didn't get any photos of this one, but it's just as well. The whole thing was a major disappointment. I had the beef sliced and sauce pre-made and thrown into the freezer, so when the time came, all I had to do was throw it in the crock pot. At this point, I was thinking I was on to something really good!

As the beef cooked, it smelled incredible. I was getting really excited for dinner! However, once I added the broccoli and let it finish cooking, it didn't taste nearly as good as it had smelled earlier. 

Unfortunately, I had pre-assembled this one twice, so we'll have to have it again. Next time I'm going to steam the broccoli separately and then just pour the beef and sauce over it instead of cooking it together. I don't know if that will help or not, but I will let you know!

Crock Pot Beef and Broccoli
Ingredients
1 pound boneless beef chuck roast, sliced into thin strips
1 cup beef consumme
1/2 cup soy sauce
1/3 cup brown sugar
1 tablespoon sesame oil
3 garlic cloves, minced
2 tablespoons cornstarch
2 tablespoons sauce from the crock pot after being cooked
Fresh broccoli florets (as many as desired)
Hot cooked rice

Directions
1. Place beef in a crock pot.
2. In a small bowl, combine consomme, soy sauce, brown sugar, oil, and garlic. Pour over beef. Cook on low for 6-8 hours.
3. In a cup, stir cornstarch and sauce form the crock pot until smooth. Add to crock pot. Stir well to combine.
4. Add broccoli to the crock pot. Stir to combine.
5. Cover and cook an additional 30 minutes on high (the sauce has to boil for it to thicken).
6. Serve over hot cooked rice.

Tuesday, August 7, 2012

Pulled Pork Sandwiches

This is a super easy one! Yesterday, I made Parmesan Honey Pork Roast in the crock pot. It turned out so tender, I couldn't even get it out in one piece. Once Studdly Hubby and I had our fill, we shredded the leftover pork and put it in a storage container. I then poured Jack Daniels Barbecue Sauce over it. I'm not a huge fan of this one because it has a strong smokey flavor, but that is the exact reason that Studdly Hubby does like it. For this reason, I didn't use a ton of it (I just eye-balled it), because I figured if he wanted his with more sauce, he could add some directly to his sandwich.


I served the "pulled pork" on whole wheat buns, with a side of Bush's Vegetarian  Baked Beans (Fat Free!). I'll admit that the sandwich was a little dry since I was conservative with the sauce, but I dipped mine in the sauce from the beans and it was a match made in heaven!

I calculate about 9 WW Points for this sandwich.

-Rachel


Monday, August 6, 2012

Parmesan Honey Pork Roast

Tonight was the real kick-off to my monthly menu planning. I did all the assembly work on Saturday, but today was the first time I actually cooked something from it. And let me tell you, it turned out great! I made Parmesan Honey Pork Roast, a recipe I originally found on Pinterest (view here). On Saturday, I bought an almost 5 pound pork roast (it was the smallest I could find!) and cut it in half. I then placed then in a large storage bag, then mixed the sauce in a quart sized bag and tossed it all in the fridge. This morning, I threw it in the crockpot.

Six and a half hours later, the roast was FALLING APART. I couldn't even get it out of my crock pot in one piece! I actually probably could have taken it out a half hour earlier or maybe even a little before that because there were a few spots that were a little dry. But other than that, I can't believe how it easy it was to make something so good!


I had planned on serving it with a side of Roasted Broccoli, but after the Beef and Broccoli was assembled, I realized I hadn't bought enough. So instead, I made some rainbow rotini and tossed it with extra-virgin olive oil and Parmesan cheese. Mmmm. The recipe includes directions for a gravy as well should you decide to serve it with potatoes.


Studdly Hubby was very happy with the roast, but he doesn't love pasta as much as I do, so he says he could have done without that. 

Slow Cooker Parmesan Honey Pork Roast Recipe

Ingredients:
1 (2-3 pound) boneless pork roast
2/3 cup grated Parmesan cheese
1/2 cup honey
3 Tbsp soy sauce
2 Tbsp dried basil
2 Tbsp minced garlic
2 Tbsp olive oil
1/2 tsp salt
2 Tbsp cornstarch
1/4 cup cold water

1. Spray slow cooker with non-stick cooking spray. 

2. Place roast in slow cooker.
3. In a small bowl, combine the cheese, honey, soy sauce, basil, garlic, oil and salt; pour over pork. 
4. Cover and cook on low for 6-7 hours or until a meat thermometer reads 160°.
5. Remove meat to a serving platter; keep warm. 


Gravy
1. Skim fat from cooking juices; transfer to a small saucepan. 
2. Bring liquid to a boil. 
3. Combine cornstarch and water until smooth. 
3. Gradually stir into pan. 
4. Bring to a boil; cook and stir for 2 minutes or until thickened. 

*I estimate this to be about 9 WW Points with 8 servings.*

Because I plan on using the leftovers for this roast for Pulled Pork Sandwiches, I shredded the leftovers and placed them in a container and drowned it in barbecue sauce. I'm looking forward to eating it again!

-Rachel

Thursday, September 22, 2011

Pumpkin Bread

Today I needed to bake something for our bake sale at work to benefit the Alzheimer's Association Walk To End Alzheimer's. Because one of the best parts of fall is pumpkin and apples, I decided to bake pumpkin bread! Beth, my supervisor, told me about a recipe from the American Heart Association. I gave it a try and let  me tell you, a nice warm slice slathered in butter really hits the spot! It was ridiculously easy to make, although it does take an hour to bake. Give it a try!

If you're interested in making a donation towards the Walk To End Alzheimer's, click here.


Ingredients:
-3 1/2 cups all-purpose flour
-2 tsp baking soda
-1 1/2 tsps salt
-1 1/2 tsps cinnamon
-1 tsp nutmeg
-1 cup sugar
-1 cup oil
-4 eggs or egg substitutes (or 8 egg whites)
-2/3 cup water
-2 cups canned pumpkin
-1 cup chopped pecans (I'm not a big fan of pecans, so I omitted them and it was still great!)


Directions:
-Sift together the flour, soda, salt, cinnamon, and nutmeg. 
-Add sugar to flour mixture and mix thoroughly. 
-Make a well in the center of the dry ingredients and add all at once the following ingredients: oil, eggs, water and pumpkin. Mix well then add in the pecans. 
-Pour batter into 4 8x4-inch loaf pans*, filling each pan about half full. 
-Bake at 350 degrees for one hour or until a wooden toothpick inserted in the center of the loaf comes out clean.
Yield: 4 loaves 1/16 of a loaf equals approximately 85 calories
*I used 2 larger loaf pans for 2 loaves of bread.


I give this recipe 4 stars.
3 Stars from Studdly Hubby!

Wednesday, September 7, 2011

Crockpot Chicken and Corn Chowder

The temperature here in Indiana has dropped 30 degrees since the weekend, and has everyone fantasizing about football, hoodies, snuggling with someone special under a blanket on a lazy weekend. That being said, this meal was perfect for a cool fall day. It was hot, filling, nutritious (had veggies anyway), and all around comforting. I predict we will be having this many times in the cold months ahead! I may even make it for the book swap party I'm planning!

*Directions intended to throw in the crockpot in the morning before running out the door to work!

southerncooking.about.com
Ingredients:
-1 can Cream of Potato Soup
-1 can Cream of Chicken Soup
-1 large boneless, skinless chicken breast OR 1 cup diced chicken
-1 can whole kernel corn, drained
-1 can chicken broth
-1/4 cup+ diced red bell pepper
-1/2 teaspoon salt
-1/8 teaspoon pepper
-1/4 teaspoon thyme
-1 cup milk

Directions:
-The night before, chop up your red bell pepper. This is one less step you'll have to worry about in the AM.

-In the AM, combine all ingredients *except milk* in the crockpot. I just tossed in a whole frozen chicken breast. I used a whisk to stir it all so that I could break up all that "cream of" soup.

-Cover and cook on low for 6-7 hours. At some point, remove the chicken and shred it. Once it's been cooking awhile, it will just fall apart. If you use diced chicken, you can obviously skip this step all together!

-Add milk and cook for 30 minutes on high, or until hot.

-Served in bowls with bread of your choice. Drizzle with some extra-virgin olive oil. Devour.

Note: Adapted from recipe found on About.com. I accidentally used a whole can of chicken broth rather than a cup, so I added about a tablespoon of corn starch at the end to thicken it up.

I gave this recipe 4 stars.
Studdly Hubby Rating: "Pretty Good"

Friday, August 12, 2011

Poor Man's Mac and Cheese

Ladies and gentlemen, when I was young, my family did not have a lot of money. We were most certainly lower class. There are many who come from those kinds of circumstances and reminiscence about the fact that they didn't know any different and were happy with second hand clothes, playing in the dirt, blah blah blah. I am not one of those people. I HATED being poor. But we'll save all that for another blog. The point I'm getting to is that even though I hated our lack of resources and our sad little meals, there is one that rises above the rest. One meal that I still devour and find incredibly comforting. That is, baked macaroni and cheese. It's so simple and so inexpensive. It's not even worthy of calling a recipe, but I'm going to share it anyway. You can serve it as a side dish, but for me, it's a meal.

Here's what you need:


Cooking Spray, Elbow Macaroni Noodles, American Cheese, Breadcrumbs. That's it. For real.

Now, to get started. Preheat your oven to 450 degrees. Boil some water. Enough to adequately cover your noodles and leave of couple inches of water. This will depend on how many servings you are making.

Intense, I know.
Next, add your noodles. When cooking for myself and my husband (or maybe just myself) I use about 2 cups. Let these boil for 8-9 minutes. Strain. *Note* My colander was not available at the time so I strained the water out and let the noodles hang out in the pot they were cooked in. Don't do this. Your noodles will stick to the pan. It's not pretty.


Mmmm...noodles...
Now, spray your casserole dish with the cooking spray. In a pinch, you could also butter it. Add a small layer of your cooked noodles.


Next, add a layer of American cheese. The trick here is to really cover that layer of noodles, so depending on the size/shape of your pan, you may need to be a bit strategic. For example, I put down one whole slice on the edge, then broke the second slice into thirds.

We're talking about cheese here people. Strategy matters.
After the cheese comes another layer of noodles, then another layer of cheese. Repeat this process until you have used all of your noodles.


Now you should be looking at the top layer of noodles. This is a very important layer. This time when you add the cheese, you want to cover the whole thing with zero gaps. I also nudge the slices down the sides, just a little.

*nudge*


When I was little, my mom would crumble saltine crackers on the top layer. That way is delicious, but I rarely have those available. And I don't want to open a bag just to use a couple and have the rest go stale. So I use breadcrumbs. And you know? Equally heavenly.


Pop the whole thing in the oven for around 20 minutes, again, this may vary depending on the size, but all you're really doing is melting the cheese.


It's done when the top is browned.


And that top layer? That heavenly, salty, crispy, cheesy layer? It's kind of the best part.


For the time and money, this is definitely worth a try. My husband doesn't care for it, but this is the same person who doesn't like Cracker Barrel or diners. There are ways to jazz this up. Use different kinds of cheese, add veggies, different toppings...Cook it with salsa and top with crushed tortilla chips for a fiesta version! The options are endless! Please share if you try any! :-)

Approximately 6 Weight Watchers Plus Points/cup

Bon appetit!
Rachel


Sunday, February 6, 2011

Superbowl 45 - Chicken Enchilada Dip

Welcome all ye from the land of Pinterest! I hope you get a chance to try this dip. It really is amazing! I know I'll be making it again for the Super Bowl this year!

This dip is something I tried at one of my in-laws Christmas get-togethers. Studdly Hubby's grandmother had brought it and I could have easily devoured the whole thing by myself! I was a little obsessed with it after that so I got on Google and hunted down the recipe. I found it on AllRecipes.com

Feel free to make this one, but I feel have the responsibility to warn you: It is addictive. It's not like Pringles. I can stop eating those. It's much more dangerous. I could eat the whole pan by myself. 

There. Any addictions, burst stomachs or digestive issues are not my problem. I warned you.

Here we go!

Begin by roasting about a pound of chicken breasts for 20 minutes or until fully cooked. I did this step this morning so I could let the chicken cool for the next step - shredding it. For this, I just use 2 forks and go to town.


It's pretty brutal.
Once all the chicken is shredded, throw it all into a large mixing bowl.

There. The hard part is over! Now you just add the rest of the ingredients, and mix thoroughly. 
Unmixed...don't those chiles on top look lovely?
All mixed up and ready to be spread into the baking dish.

Ladies and Gentlemen, here it is, in all its baked cheesy glory:

It doesn't look like much, but believe me...it's like a drug. The
most delicious narcotic you will ever encounter.

I'm having a hard time stopping myself from continuing to shoveling more of this delightful concoction into my face. Like I said. You were warned!!

Om non nom!

Ingredients:

  • -1 pound skinless, boneless chicken breast halves
  • -1 (8 ounce) package cream cheese, softened
  • -1 (8 ounce) jar mayonnaise
  • -1 (8 ounce) package shredded Cheddar cheese
  • -1 (4 ounce) can diced green chile peppers
  • -1 jalapeno pepper, finely diced (Optional! I skipped this.)

Directions:

-Preheat oven to 350 degrees F (175 degrees C). Place chicken breast halves on a medium baking sheet.

-Bake in the preheated oven 20 minutes, or until no longer pink. Remove from heat, cool and shred.

-Place shredded chicken in a medium bowl, and mix in cream cheese, mayonnaise, Cheddar cheese, green chile peppers (and jalapeno pepper, if you choose). Transfer the chicken mixture to a medium baking dish.

-Bake uncovered in the preheated oven 30 minutes, or until the edges are golden brown.


Superbowl 45 - Pizza Dip

While I am not a football fan, I do appreciate some aspects of the Superbowl. I love the idea that millions of people are watching the same thing at the same. It's very unifying. I read this on Wikipedia: " Super Bowl XLIV, played on February 7, 2010 between the New Orleans Saints and the Indianapolis Colts, became the most-watched American television program in history, drawing an average audience of 106.5 million viewers and taking over the spot held for twenty-seven years by the final episode of M*A*S*H." 

Which leads me to my next favorite thing: the commercials! Most of them hilarious or touching, as well as obscenely expensive (we could several third world countries with that kind of green!), and coupled with the fact that all those people are watching it with you, you'll have something to talk about on Facebook and with your co-workers the next day.

And of course, there is the food. Today, our menu consists of Pizza Dip, Chicken Enchilda Dip, and Tyson's Buffalo Chicken Bite Anytizers. For drinks, we have Sam Adams Boston Lager (for Studdly Hubby), and Lemon Drop and Pomegranate Martinis for moi. Plenty of food for 2 adults. 

My first recipe that I will be sharing with you today (as you may have guessed already by the title) is the Pizza Dip. I did not create this recipe...I don't really create any recipe, but I do tweak them to my liking/pocketbook. This one comes from my college friend Adam Barkley. Where he got it I do not know. But I begged him for the recipe over Facebook and he kindly shared it with me. O happy day!!

Here are 2 specific ingredients I have found helpful for this recipe:

Pizza sauce in a squeeze bottle and mini pepperoni.
Really. It doesn't take much to impress me!
Ok, here we go. The first thing you want to do is mix together some cream cheese with Italian seasoning. Once that is thoroughly combined, spread it in the bottom of a greased baking dish.

Can you see those little puddles of yellow in the corners?
That's from where I realized I did NOT grease the pan and sprayed
it around the edges still visible. Oops.


With that complete, mix together some Parmesan and Mozzarella cheese. Then sprinkle half the mixture onto the cream cheese.This is where the magic begins.

Cheese mixed with cheese sprinkled on top of cheese.
Sounds like a winner so far!
Next, layer your favorite pizza sauce over the cheeses.


It should look something like this:

But wait, we're still not done!
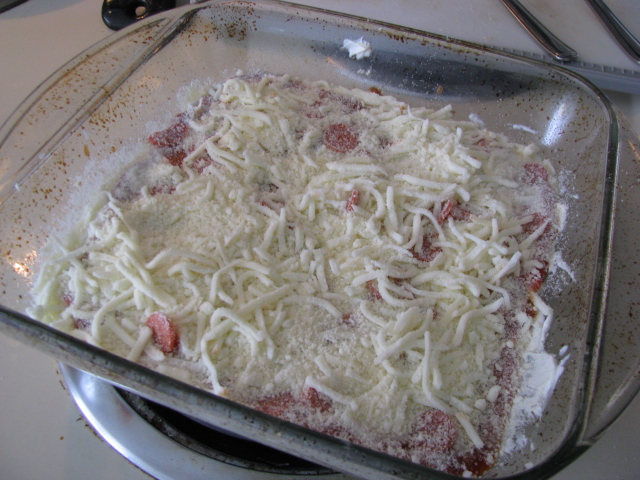
This is the point where I add my mini pepperonis.


Do you see how I tried to be all cute and daintily sprinkle them on from the bag? Bad idea. They kind of stick together, so then you have to pick them up out of the sauce and separate them. After the pepperoni is applied (evenly!) then you can finish it off with...drumroll please...more cheese!


Here she is, ready for the oven.
Ok, that's a lie, I added a little extra mozzarella after this. :-)
Put that in a 350 degree oven for about 20 minutes and you get this:


That wasn't good enough for me, so I switch the oven to broil and left it for 2 more minutes. The results:

O yes. I can dig into this.

That's it! Serve with chips, crackers or your favorite bread/breadsticks. I chose a loaf from Meijer:


ENJOY!!


Recipe:
Ingredients

-1 8 oz. package cream cheese, softened.
-1 tsp Italian seasoning.
-1 Cup shredded mozzarella cheese.
-3/4 Cup Parmesean cheese
-1 8 oz. jar (or squeeze bottle!) pizza sauce
-a handful of mini pepperonis and/or any other toppings you would prefer
-breadsticks ( Your favorite)
Instructions:
-Preheat oven to 350.
-Combine in bowl, the cream cheese and Italian seasoning. Mix well.
-Spread in bottom of greased ( with Pam or cooking spray) glass baking dish.
-Combine cheeses, sprinkle half of the cheese mixture over cream cheese.
-Spread pizza sauce evenly over , then top with the remaining cheese , peppers and onions.
-Bake 15 to 18 minutes or until melted and mixture is bubbling around the edges.
-Serve with breadsticks or whatever you like to use for dipping.
-Devour!!